|
Page 1
- 2
The
mechanics of moving a "Starter" outfit into a level
Let's
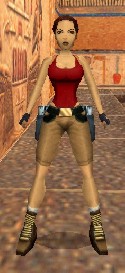
assume for the moment that you have just downloaded an outfit in a
"Starter" wad file format named "Lara_in_Blue.WAD" or that you
already have this outfit in your "Laras Closet\Outfits" folder.
(There may also be a WAS file with it.) Since the downloaded file is
already in a "Starter" wad file format, you would place it in your
"Laras Closet\Outfits" folder.
Let's
also assume that you have a level that you would like to have Lara
wear this new "blue outfit" in, and we'll assume that the level uses
the "Playable Tutorial Level" wad files. Here's the steps to
follow.
NOTE: There's a difference between a "wad" and a "WAD"
file. A "wad" is a collection of files that make up a particular
wad, including the "WAD" file. A "WAD" file is an individual file
that has "WAD" for an extension.
First,
we need to know where the wad files are for the particular level
that you want to modify. If you are like a lot of us, that level may
be one of many levels that use the same wad. I have at least 5 or 6
different levels that all use the "Playable Tutorial Level" and
whose wad files all begin with "tut1." When I want to play one of
them, I usually have to go back and load its "project" file and
rebuild it. This creates new wad files in my "trle\graphics\wads"
folder all starting with the "tut1" name. You need to be able to
locate all the correct wad files for your level. In this case, if
the game is the current "Playable Tutorial Level" that should be all
the files
that start with "tut1" in the "trle\graphics\wads"
folder.
The
next thing we need to do is to get our outfit in the proper folder
with the proper name. Using the Windows Explorer, copy your
"Lara_in_Blue.WAD" file into your "Laras Closet\Starter" folder.
(This includes the WAS file if present.) Rename the existing
"Starter.WAD" file to "Starter_orig.WAD." Rename "Lara_in_Blue.WAD"
to "Starter.WAD." (Rename the WAS files if present also.)
Go
ahead and boot up the TRwest program. If you haven't read the manual
as mentioned earlier, be sure to do so. Although I'll help you with
the use of TRwest in this tutorial, I'm still strongly suggesting
that you read the manual from start to finish.
What
you see are two different windows with some buttons in between them.
At the top is a menu bar. The right hand window lists all of the
objects currently contained in all of the TR4 levels, including the
TRLE game and the Exclusive Times level. This window is used to
display which objects are already included in the WAD file that
you're working on. If an object is already in the wad then there
will be a checkmark to the left of the object's name.
For
this tutorial, I'll have you load in one of your existing wads to
represent the level that you want to add Lara and her new outfit to,
however, we will not be making any actual saves. I wouldn't want you
to overwrite an important file. I'm guessing that you have a "tut1"
wad in your "trle\graphics\wads" folder. In the upper left corner
click... File... and select "Open Wad for Editing." Navigate to
your...
C:\Program Files\Core
Design\trle\graphics\wads
folder
and double click on the "tut1.WAS" filename. If you don't have a
"tut1" wad, go ahead and select any of the wad names to load. As
soon as the information from the wad is loaded, the right window
displays checkmarks opposite each object that's currently in the
wad. This is the wad that we'll be modifying.
The
left hand window acts like a shopping cart. You load in what are
referred to as reference files. It is used to display objects that
can be selected and added to your current wad that's being displayed
in the right window.
Again,
assuming that the "Starter.WAD" file that's in the "Laras
Closet\Starter" folder now contains the new outfit, go ahead and
click... File... and select "Load Reference File." Maneuver to your
"Laras Closet\Starter" folder and select the "Starter.WAS" file.
This file contains a list of the objects in the wad file that
contains your new outfit.
In your
left window will be a box with a plus sign in it and to its right
will be "Starter.WAS" -- the name of the wad file that was just
loaded. Click on the box with the plus sign to expand the listing.
This will show all of the objects in our "Starter" type wad files.
The wad was designed so that you could have just copied all of the
objects at one time into the wad in the right window, however, a
problem occurred with a couple levels we tested. Because of this,
you'll have to move the objects from the reference wad on the left
into the wad on the right one at a time. First click on "Options"
and deselect the two confirm options. Next, start at the top of the
list on the left and select them one at a time, clicking on the
"Add>>" button in the middle for each object. DO NOT SELECT
OBJECT #246, #461, or #462 ! Later, when you are actually making
the changes, you will then click on "File" and select "Save Wad."
Confirm overwriting and you're done. Lara and her new outfit are now
part of the modified wad file.
PLEASE READ THE FOLLOWING IMPORTANT
NOTICE...
Currently, the "Starter" wad file contains the DOOR_TYPE1
object. We are hoping to find a means of removing this object, but
for now I'm afraid that it's a bit of a nuisance. Since it can not
be separated from Lara in this wad, it will overwrite any DOOR_TYPE1
objects in your new level. If you have the Project file for the
level, modifications can be made to correct this. If you do not have
and can not obtain the Project file, you may have to play the level
with this door appearing and working strangely. The following
information explains how to correct the various levels.
In each
case, boot your TRwest program and click File... Open Wad for
Editing. Navigate to the wad file that you are moving Lara into and
double-click it. Since this wad now has the DOOR_TYPE1 from the
"Starter" wad file in it, we need to place the DOOR_TYPE1 that was
originally there back into the wad, but as a different door. With
your TRwest program still open, load the original wad file into
TRwest as a Reference file. (Click... File... Load Reference File
and select the same file that's already loaded in the right hand
window.) You'll next select DOOR_TYPE1 in the left window and then
select where it's going to go (based on the info below) in the right
window. Click the "Replace>>" button to move the original
DOOR_TYPE1 into its new slot in the wad that we're
modifying.
If the
level uses the Catacombs wad, move DOOR_TYPE1 into DOOR_TYPE4.
If
the level uses the City wad, move DOOR_TYPE1 into DOOR_TYPE6.
If
the level uses the Cleopal wad, move DOOR_TYPE1 into
DOOR_TYPE8.
If the level uses the Guard wad, no change is
required.
If the level uses the Karnak wad, move DOOR_TYPE1 into
DOOR_TYPE4.
If the level uses the Library wad, no change is
required.
If the level uses the Settomb wad, move DOOR_TYPE1 into
DOOR_TYPE3.
If the level uses the Tut1 wad, move DOOR_TYPE1 into
DOOR_TYPE3.
Inside
the level using the Room Editor, click Object... Find Object and
then search for any DOOR_TYPE1 objects. When you find one, select it
and then click on the Object ->Trigger to find where its trigger
is located. With this info you can now delete the existing
DOOR_TYPE1 and replace it with the corresponding door as listed
above, depending on which wad was used.
For a
level that uses the Coastal wad, things get a bit more complicated.
First, load the level into the Room Editor and search for all
KEY_HOLE1 and KEY_ITEM1 objects. Note where they are, where their
triggers are, and their OCB settings. Then load the wad into TRwest
using File... Open Wad for Editing. Select #203 KEY_ITEM1 and
"Delete" it. Select #284 KEY_HOLE1 and "Delete" it. Now click
File... Save Wad and overwrite the existing file.
Next
load in the original wad using File... Load Reference File. Select
DOOR_TYPE1 and move it into DOOR_TYPE2.
Now
load in the "Starter" wad using File... Load Reference File. Add all
objects except #246, #461, and #462. Once again click File... Save
Wad and overwrite the original file.
From
the original wad file in the left window, select KEY_HOLE1 and move
it into KEY_HOLE2. Select KEY_ITEM1 and move it into KEY_ITEM2.
Select the CROWBAR_ITEM and "Add >>" it. Lastly, click File...
Save Wad and overwrite the wad again.
When
you load the project, ignore the errors that pop-up because of the
objects we deleted. Using the method mentioned above, replace the
DOOR_TYPE1 objects with DOOR_TYPE2 objects. Place KEY_HOLE2 where
KEY_HOLE1 was and set its trigger. Place KEY_ITEM2 where KEY_ITEM1
was. Set the proper bits for each object's OCB settings.
Save
your modified wad files and/or project files as needed.
A
FEW WORDS OF CAUTION: If the level that you are adding Lara in
her new outfit to contains Lara in an outfit that you don't want to
lose, then by all means, save the existing WAD file in a temporary
place so that you can put it back when you want Lara back as she
was.
Go
ahead and exit from the TRwest program. Use your Windows Explorer to
delete the "Starter.WAD" file (And the WAS file if it was present.)
from your "Laras Closet\Starter" folder. Rename the
"Starter_orig.WAD" file (And WAS file if present.) back to
"Starter.WAD."
All
that's left to do now is to build the modified level so that the
changes will take effect and show up in your game. Use the Level
Convertor to do this.
Finally
You
should now have a good idea of how to go about adding a "Starter"
outfit to a new level or to a level that already exists. About the
only thing that can go seriously wrong is to accidentally delete or
write over an existing file that can't be recovered. A wise
individual always keeps backups of any and all files that can't
easily be obtained elsewhere. I always backup my entire "trle"
folder onto a second hard drive. I urge you to use whatever you
currently have for a backup system and make a backup of yours as
well. Do this periodically.
Have fun!
|